Spring Boot 项目配置文件
文章目录
配置文件的作用
整个项目中重要的数据都是在配置文件中配置的,例如:
- 数据库的连接信息(包含连接主机、用户名和密码的设置);
- 项目的启动端⼝;
- 第三方系统的调用秘钥等信息;
- 发现和定位问题的普通日志和异常日志等
Spring Boot 配置文件主要分为以下两种格式:
- .properties
- .yml
配置文件都是放在:/src/main/resources中的,默认的 Spring Boot 项目生产的是 .properties 格式的配置文件,.yml 格式文件需要自己手动创建
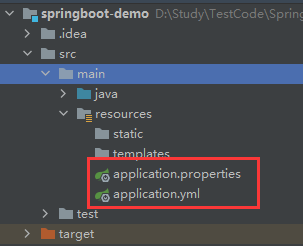
注意事项:
- properties 可以和 yml ⼀起存在于⼀个项目当中,但是如果两个配置文件中出现了同样的配置那么会以 properties 中的配置为主,但加载完 .properties 文件之后,也会加载 .yml 文件的配置信息。
- properties 配置文件是 Spring Boot 项目的默认配置文件
properties
基本语法
properties 是以键值的形式配置的,key 和 value 之间以 “=” 连接。
# 注释
server.port=8088
spring.datasource.url=jdbc:mysql://127.0.0.1:3306/testdb?characterEncoding= utf8
spring.datasource.username=root
spring.datasource.password=root
读取文件信息
在项目中想要主动的读取配置文件中的内容,可以使用 @Value 注解来实现
import jakarta.annotation.PostConstruct;
import org.springframework.beans.factory.annotation.Value;
import org.springframework.stereotype.Component;

/* @Component 在 Spring Boot 启动时候会注入到框架中
	注⼊到框架中时会执⾏ @PostConstruct初始化⽅法
	读取配置文件信息
*/

@Component
public class UserComponent {
    @Value("${server.port}")
    private String port;

    @PostConstruct
    public void postConstruct() {
        System.out.println("Read properties: port: " + port);
    }
}
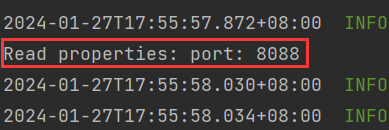
缺点
例如下面的配置信息中:
# 注释
server.port=8088
spring.datasource.url=jdbc:mysql://127.0.0.1:3306/testdb?characterEncoding= utf8
spring.datasource.username=root
spring.datasource.password=root
从上述配置key看出,properties 配置文件中会有很多的冗余的信息,出现了很多次的 spring.datasource.
这样写起来就很麻烦,代码也不好看,这时候旧的考虑 yml 配置文件了
yml
基本语法
yml 是树形结构的配置文件,基础语法是“key: value”,注意:key 和 value 之间使用英文冒汗加空格的方式组成的,空格不可省略
# 注释
spring:
  datasource:
    url: jdbc:mysql://127.0.0.0:3306/dbname?characterEncoding=utf8
    username: root
    password: root
这样写出来了代码就简约明了
优点
- yml 是⼀个可读性高,写法简单、易于理解,它的语法和 JSON 语⾔类似。
- yml 更多的数据类型,它可以简单表达清单(数组)、散列表,标量等数据形态。它使用空白符号缩进和大量依赖外观的特色,特别适合用来表达或编辑数据结构、各种配置文件等。
- yml 支持更多的编程语言,它不止是 Java 中可以使用在 Golang、PHP、Python、Ruby、 JavaScript、Perl 中同样可以
配置不同数据类型
# 注释
string: hello

boolean: true

int: 22

float: 22.22
那么对于 yml 的获取文件信息,和 properties是一样的,同样使用 @Value zhujie
@Controller
public class UserController {
    @Value("${string}")
    private String hello;
    @Value("${boolean}")
    private String bool;
    @Value("${int}")
    private String Int;
    @Value("${float}")
    private String Flo;

    @PostConstruct
    public void doPostConstruct(){
        System.out.println("string: " + hello);
        System.out.println("boolean: " + bool);
        System.out.println("int: " + Int);
        System.out.println("float: " + Flo);
    }
}
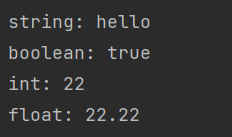
字符串类型的写法
- 字符串默认不要加上单引号或者双引号
- 加英文的单双引号就会表示特殊的含义
# 注释
str1: hel\nlo
str2: 'hel\nlo'
str3: "hel\nlo"
\n 是有着换行的特殊含义的,那么对于加或不加的字符串会有什么效果
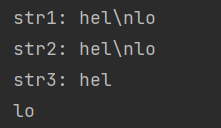
可以看到,不加和加了单引号就会得到 原所写的字符串
加了双引号就会变成原义输出
配置对象
yml 可以直接配置对象
student:
  id: 1
  name: 张三
  age: 22
或者可以使用行内式
student: {id: 1, name: 张三, age: 22}
配置好了之后就可以直接通过 @ConfigurationProperties 注解去获取配置对象了
@Getter
@Setter
@ConfigurationProperties(prefix = "student")
@Component
public class StudentComponent {
    private String name;
    private int id;
    private int age;

    @Override
    public String toString() {
        return "StudentComponent{" + "id= " + id + ", " +
                                    "name= '" + name + '\'' +
                                    ", age= " + age + '}';
    }
}
注意:使用 @ConfigurationProperties 注解的类一定要有 Get和Set 方法。可以跟上述代码一样使用 LomBok 也可以直接写出来
通过控制类去获取该 Bean 打印查看结果
@Component
public class StudentController {
    @Autowired
    private StudentComponent studentComponent;

    @PostConstruct
    public void print(){
        System.out.println(studentComponent);
    }
}

配置集合
yml 也可以配置集合
dbtypes:
  name:
    - mysql
    - sqlserver
    - test
或者使用行内式
dbtypes: {name: [mysql, sqlserver, test]}
然后通过list 去接收
@Getter
@Setter
@ConfigurationProperties(prefix = "dbtypes")
@Component
public class NameComponent {
    private List<String> name;
}
通过控制类去获取该 Bean 打印查看结果
@Component
public class NameController {
    @Autowired
    private NameComponent nameComponent;

    @PostConstruct
    public void print(){
        System.out.println(nameComponent.getName());
    }
}

读取配置文件的几种方法
Spring Boot 中读取配置文件有以下 5 种方法:
- 使用 @Value 读取配置文件。
- 使用 @ConfigurationProperties 读取配置文件。
- 使用 Environment 读取配置文件。
- 使用 @PropertySource 读取配置文件。
- 使用原生方式读取配置文件。
@Value 和 @ConfigurationProperties 在上文已经讲过了
Environment
首先 Environment 是一个类,这个类可以直接使用 @Autowired 去注入,注入完成后就可以调用其 getProperty 方法去获取指定配置信息了
@SpringBootApplication
public class SpringbootDemoApplication implements InitializingBean {
    @Autowired
    private Environment environment;

    public static void main(String[] args) {
        SpringApplication.run(SpringbootDemoApplication.class, args);
    }

    @Override
    public void afterPropertiesSet() throws Exception {
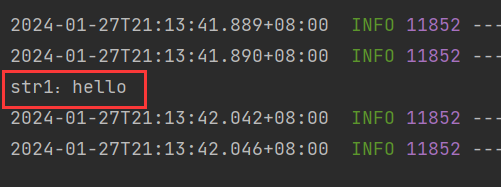
        System.out.println("str1:" + environment.getProperty("str1"));
    }
}
@PropertySource
使用 @PropertySource 注解可以用来指定读取某个配置文件,但是只是指定,还是得用到 @Value注解去获取
@SpringBootApplication
@PropertySource("classpath:application.yml")
public class SpringbootDemoApplication implements InitializingBean {
    @Value("${str1}")
    private String str1;

    public static void main(String[] args) {
        SpringApplication.run(SpringbootDemoApplication.class, args);
    }

    @Override
    public void afterPropertiesSet() throws Exception {
        System.out.println("str1:" + str1);
    }
}
使用原生方式读取
最原始的方式就是通过 Properties 对象来读取配置文件
@SpringBootApplication
public class SpringbootDemoApplication implements InitializingBean {
    public static void main(String[] args) {
        SpringApplication.run(SpringbootDemoApplication.class, args);
    }

    @Override
    public void afterPropertiesSet() throws Exception {
        Properties props = new Properties();
        try {
            // 指定配置文件
            InputStreamReader inputStreamReader = new InputStreamReader(
                    this.getClass().getClassLoader().getResourceAsStream("application.yml"),
                    StandardCharsets.UTF_8);
            props.load(inputStreamReader);
        } catch (IOException e1) {
            System.out.println(e1);
        }
        // 调用方法获取指定信息
        System.out.println("str1:" + props.getProperty("str1"));
    }
}
设置不同环境的配置文件
可能一个项目中不同阶段时所用的配置是不一样的,例如测试时使用的数据库是本地的,发布后使用的数据库是云端的,那这样就需要一个个修改。
在Spring Boot 项目中可以为不同的环境设置不同的配置文件,然后只需要修改主配置文件就可以指定使用哪一套配置文件,并且只需要将不同的配置分开,公共的配置还是可以放在主配置文件中。
主配置文件名必须为:
application.properties / application.yml其他的配置文件前面部分必须统一,横杠后的任取
application-XXX.properties / application-XXX.yml需要指定用某一个配置文件,只需要在主配置文件中加入
spring.profiles.active=XXX // 注意XXX是横杠后任取的名称